Ok, after a very long first and second blog this one will be (hopefully) a bit shorter. Please do read the first two blogs as I will be referring to them. I also will only explain what's new and not what already has been covered.
In this blog we will stick to the standard text screen (screen 0). I'm going to explain some other usefull BIOS calls and we will make a little program with a graphical effect in which we will use loops with counters in it.
Clear the screen
In MSX BASIC you can use the
CLS instruction to clear the screen. There is a BIOS call to do this in assembly. First go to
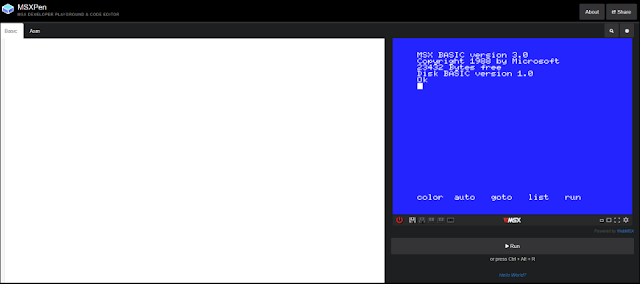
MSXPen again as we will use this as our programming environment.
We will always need our 1 line of BASIC again to run our machine code:
10 BLOAD"PROGRAM.BIN",R
And there are also a few lines of assembly that we will always use:
org 0xD000 ; the address of our program
start:
end start ; end of code
Personally I always first click on Hello World? at the right side of the screen below the Run button. This opens a new MSXPen screen that already contains the line of BASIC and a small assembly program. I remove the lines I won't use and then I'm ready to go.
Now enter the following code.
CLS: equ 0x00C3
The symbol CLS is equal to 0x00C3 and stands for an address in memory of a bios call that we can call to clear the screen. But in order for this call to actually work the zero flag from the flag register needs to be set. I don't know why this is the case, but I've just read this in the documentation (a list of BIOS calls can be found here).
There is no direct instruction to set the zero flag, so before we make the call we need an instruction that has zero as a result. That will then set the zero flag in the flag register.
There are several ways to do this. In this example we substract two numbers that are equal with the next instruction:
sub a
The instruction sub is an abbreviation for subtract. It always substracts something from the accumulator, register a. Therefore we only need to indicate what is substracted from a. In this case it is register a itself that we will subtract from a. So what the Z80 does is that it calculates the sum a minus a and puts the result back into register a. Of course the result will always be zero and so the zero flag is set.
call CLS
Now we make the call to clear the screen. It clears the screen, then returns to next instruction (in our case ret) and that takes us back to the BASIC environment.
Positioning the cursor
In BASIC it's possible to locate the cursor with the LOCATE instruction. In assembly there's also a BIOS call we can use for this. It is called POSIT and the memory address is 0x00C6.
It works very simple: just load the x coordinate in register h and the y coordinate in register l and make the call. What is a bit strange is that the top left is position (1,1) where in BASIC it is (0,0). So remember to start counting at 1 for the x and y coordinate in assembly.
Note: some documentation I've seen have mixed up the h and l registers for the x and y coordinates.
Now change the code to this and try it out.
Using loops
We are now going to show a row of characters on the screen that appear after each other with just a little pause between their appearance. The standard width of the text screen after we boot our MSX1 is 37 characters, so we will start at position (1,1) and then proceed until (37,1). Our code has to do this:
- Load the position (1,1) in register h and l
- Repeat for 37 times:
- Position the cursor
- Put character 'A' on the screen
- Increase register h that holds the value of the x coordinate
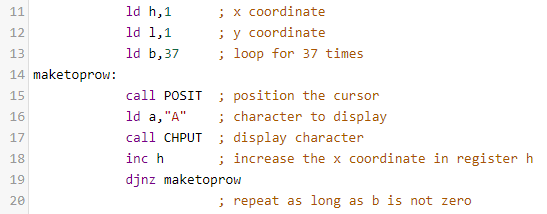
To achieve this we use a loop. We load the value 37 in register b and then we loop with the instruction djnz. This instruction stands for decrease jump not zero. It decreases the value of register b with one and then jumps to a memory address we specify as long as b is not zero. It is a relative jump which means we only can make a small jump in our code (maximum 128 bytes forward or backwards).
In assembly our loop will look like this:
- In line 11 and 12 we load position (1,1) in registers h and l.
- In line 13 we load the value of 37 in register b as we want to loop for 37 times.
- Line 14 is a label. This indicates the start of the loop. We will jump back to this place as long as b is not zero.
- In line 15, 16 and 17 we position the cursor and put character 'A' on the screen.
- Line 18 increases the x coordinate in register h with one.
- The finally the djnz instruction in line 19 decrease the value of register b with one and jumps back to label maketoprow as long as the value of register b is not zero.
You may think "Why load character 'A' again and again? Can't we just load it before the loop starts?" Well, sometimes bios calls change the value of one or more registers. The bios call POSIT changes registers a and f. So it won't work in this case.
It's very important to always check in the documentation which registers are changed by a bios call. You can try for yourself: see what happens by moving line 16. Put it just before line 14 where the loop starts and start the emulator again. Hmm... not just character 'A'...
The complete program is now as follows:
Note: We could in fact only use the POSIT call once, before the loop starts, as our cursor automatically moves to the right after we put a character on the screen. But as we need it inside the loop later on in this experiment, I wrote the code already in this way.
It works but our code immediately displays the row, there's no pause between the appearance of the characters. To create a pause we will make use of the halt instruction. To understand what this does, you have to understand what an interrupt does on the Z80 processor.
Sometimes there are tasks that need to be performed with priority, such as processing data read from a cassette or disk drive. An interrupt is then send to the Z80 and the program counter will immediately jump to a certain place in memory. Some instructions are executed there and then the program counter returns to where it left. More or less the way it works with a call instruction.
There is an interrupt that is invoked every time the screen has been drawn. This happens 50 times per second (on a PAL television or monitor) or 60 times per second (on a NTSC television or monitor). I will show you later how we can use this as a timer for our programs to perform certain tasks or control the game speed, but for now we will use this just to slow down our program.
What the halt instruction does is that it waits for the next interrupt. So the program counter stops and will proceed when an interrupt is send to the Z80. First, of course, the instructions associated with the interrupt are executed, but then our program continues again.
And although there are other interrupts than the one invoked after a screen that has been drawn, we will see that this will slow down our program a little bit. For now it will do.
So, change the loop to this and see what happens:
Notice that I have use the halt instruction twice. This is to slow it down just a bit more. You can experiment with this by adding or removing halt instructions to get the speed that you like.
Now we are going to make the character 'A' disappear before the character next to it appears. This will cause the effect of a moving character 'A' on the screen. In the loop we position the cursor again to the same coordinates (it moved to the right after we put the character on the screen) and then we put a space (" ") on the screen that overwrites our character 'A'.
Change the loop to this and try it out:
Ok, so now our character 'A' seems to be moving from the left to the right. Let's see if we can move it down from there at the right side of the screen. We now add one to the y coordinate in register l with the instruction inc l (increase register l).
After our loop the coordinates in register h and l are (37,1). No, not (38,1) as we increased register h one more time before the loop ended!
We want to start at (37,2) and therefore we have to decrease the x coordinate in register h and increase the y coordinate in register l. We use the dec instruction to decrease the value of register h with one.
We will loop for 21 times and end in the right corner.
So the loop to move the character 'A' down to the right side of the screen looks like this:
Notice a different label in line 30 and 40. We can't use the same label twice in our program as it must be clear where to jump to. Also notice that ret is still the last instruction to return to BASIC.
To finish our program we will need two more loops. One to make our character 'A' move from the bottom right to the bottom left and one to move from the bottom left to the top left.
Both loops are very similar to the second loop. First the x and y coordinate are adjusted to start at the right position and the we decrease one of the coordinates in register h or l.
They look like this:
Now our character 'A' is back at the starting position. The last thing that we will do is that we will make it move 'forever' (until we shut down or restart our MSX or emulator). We just don't return back to BASIC anymore!
First insert a label movecharacterA just before the first loop:
Now, after the fourth loop we jump back to label movecharacterA on line 11. This ensures that it will keep on moving.
To make the jump we replace the ret instruction with a jp instruction (jump). The program counter will jump back to the place in the program that is indicated by the label.
Ok, let me make one thing clear: the program we just wrote is certainly not the best or fastest program to achieve this effect! There a lot of repetitions in it and it can be written (a lot) shorter with different techniques. But my main goal was to show how loops works and how you can use them in an understandable way. It was just a little experiment. I hope that you understand the code and and encourage you to experiment on your own!


Reacties
Een reactie posten